
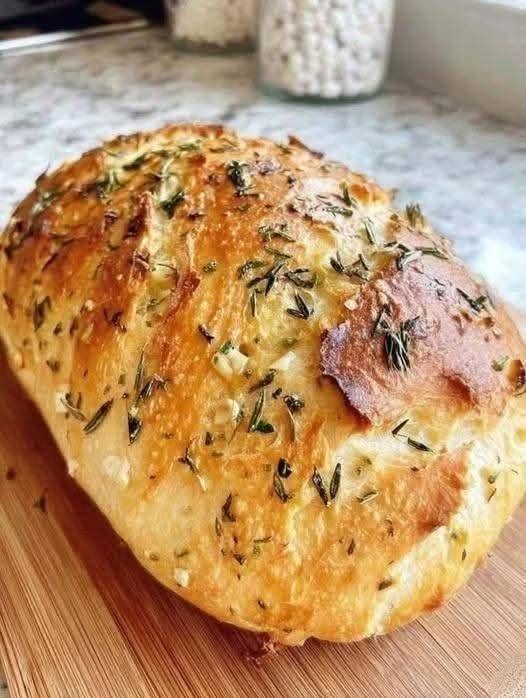
The bread in your photo looks like a rustic garlic-and-herb artisan loaf with a crisp, deeply browned crust and soft, chewy interior. A Dutch oven is ideal because the covered pot traps steam, helping produce that thick, crackly crust. Similar garlic-herb versions use about 3 cups flour, 1½ cups water, garlic/herbs, and a 450°F bake with the lid on first and Recipe at a glance
- Yield: 1 large loaf
- Servings: about 10–12 slices
- Prep: 15–20 minutes
- First rise: 12–18 hours
- Final rest: 30–60 minutes
- Baking: 40–45 minutes
- Oven: 450°F / 230°C
- Difficulty: Easy
- Style: No-knead artisan bread
🛒 Ingredients
For the bread
| Ingredient | Amount |
|---|---|
| All-purpose or bread flour | 3 cups / 375 g |
| Lukewarm water | 1½ cups / 360 g |
| Instant yeast | ½ teaspoon / about 1.5 g |
| Salt | 1½ teaspoons / about 8 g |
| Olive oil | 1 tablespoon / 15 ml |
| Fresh garlic | 4–5 cloves, finely chopped |
| Fresh rosemary | 1 tablespoon, chopped |
| Fresh thyme | 1 tablespoon, chopped |
| Italian seasoning | 1 teaspoon, optional |
| Black pepper | ¼ teaspoon, optional |
For the topping
- 1 tablespoon olive oil or melted butter
- 1–2 tablespoons fresh rosemary
- 1 tablespoon fresh thyme
- A little flaky sea salt
- Optional: 1–2 cloves very thinly sliced garlic
- Optional: 1–2 tablespoons grated Parmesan
The basic flour/water/yeast proportions are consistent with established no-knead garlic-herb versions; some recipes use the herbs and garlic inside the dough, while others add them during shapi
👩🍳 Step-by-step instructions
1. Prepare the garlic and herbs
Finely chop 4–5 garlic cloves.
Remove the tough stems from the rosemary and thyme and chop them fairly finely.
Tip: If you want a milder, sweeter garlic flavor, roast the garlic first rather than using raw garlic. Roasted garlic gives the bread a softer, sweeter flavOUR
2. Mix the dry ingredients
Put into a large bowl:
- 375 g flour
- 1½ tsp salt
- ½ tsp instant yeast
- 1 tsp Italian seasoning, if using
- ¼ tsp black pepper
Mix well.
Important: Don’t accidentally use tablespoons of yeast. This is a slow-rise bread, so only ½ teaspoon is needed.
3. Add garlic and herbs
Add:
- chopped garlic
- rosemary
- thyme
Mix them through the flour.
You can reserve a little rosemary and thyme for decorating the top.
4. Add the water
Pour in 1½ cups / 360 ml lukewarm water.
Add 1 tablespoon olive oil.
Mix with a wooden spoon or spatula until there are no obvious dry patches of flour.
The dough should look:
- sticky
- shaggy
- wet
- uneven
Don’t knead it.
That’s normal for no-knead bread. Similar recipes specifically describe the dough as shaggy and sticky before the long fermentation.
5. First rise — the most important step
Cover the bowl tightly with plastic wrap, a lid, or a damp towel.
Leave it at room temperature for approximately:
12–18 hours
Overnight is perfect.
The dough should become:
- significantly larger
- very bubbly
- puffy
- slightly jiggly
- fragrant
A slow overnight rise is commonly used for this style of no-knead garlic bread and is responsible for much of its flavoUR
If your kitchen is cold
It may take 18–24 hours.
If your kitchen is very warm
Start checking around 10–12 hours.
Don’t judge the dough only by the clock. Look for bubbles and substantial expansion.
6. Shape the loaf
Generously flour your work surface.
Scrape the dough out of the bowl.
Because it is sticky, lightly flour your hands too.
Gently fold the dough:
- Fold the left side toward the center.
- Fold the right side toward the center.
- Fold the top toward the center.
- Fold the bottom toward the center.
- Turn it over so the seam is underneath.
- Gently form a round or oval loaf.
Don’t aggressively knead it—you want to preserve the air bubbles.
7. Prepare the topping
Place the loaf on parchment paper.
Brush the surface lightly with:
1 tablespoon olive oil or melted butter.
Then sprinkle over:
- fresh rosemary
- fresh thyme
- flaky salt
- optional sliced garlic
- optional Parmesan
For the appearance in your photograph, be generous with the herbs on top.
8. Second rise
Cover loosely with a clean towel.
Allow the shaped loaf to rest for approximately:
30–60 minutes
It doesn’t necessarily need to double. It should become noticeably puffier.
🔥 9. Preheat the Dutch oven
Place your Dutch oven, with its lid, inside the oven.
Heat to:
450°F / 230°C
Let the Dutch oven heat for approximately 30 minutes.
Preheating the heavy pot helps the dough immediately begin cooking and promotes the characteristic crust. Multiple versions of this bread use a preheated Dutch oven at 450°
⚠️ 10. Transfer the dough
This is the dangerous part because the Dutch oven will be extremely hot.
Use good oven mitts.
Carefully remove the pot.
Lift the parchment paper with the loaf and place it into the Dutch oven.
Put the lid on immediately.
11. Bake
Covered:
30 minutes at 450°F / 230°C
The lid traps steam around the bread.
Uncovered:
Remove the lid and bake another:
10–15 minutes
until the crust is a rich golden/deep brown.
Published recipes for this style commonly use approximately 30 minutes covered followed by 10–15 minutes uncovered.
How do I know it’s done?
The easiest visual test:
The crust should be deeply golden brown and crisp.
For a more precise test, insert an instant-read thermometer into the loaf.
Aim for approximately:
205–210°F / 96–99°C
A roasted-garlic version of this bread gives 210°F as an internal temperature indicator.
12. Cool before cutting
Remove the bread from the Dutch oven.
Put it on a wire rack.
Wait at least:
30–45 minutes
before slicing.
I know it’s tempting to cut it immediately, but the interior is still finishing its cooking and setting.
Cutting too early can produce a gummy center.
Optional: Make it EXTRA GARLICKY
For the bread in your photo, I would actually recommend roasted garlic.
Roasted garlic method
- Take 1 whole garlic bulb.
- Cut off the top.
- Drizzle with olive oil.
- Wrap in foil.
- Roast at about 400°F / 200°C until completely soft.
- Cool.
- Squeeze the cloves from their skins.
- Mash or roughly chop them.
- Fold the roasted garlic into the dough during shaping.
Roasted garlic is especially good because it becomes soft and sweet rather than having the sharper flavor of raw garlic.
Garlic-herb butter for serving
Mix:
- 3 tbsp softened butter
- 1 minced garlic clove
- 1 tsp chopped rosemary
- 1 tsp chopped thyme
- pinch of salt
- optional 1 tbsp Parmesan
Spread on warm slices.
For an even more indulgent version: put slices under the broiler for 1–2 minutes until the butter bubbles.
Approximate nutrition
For the basic loaf, assuming 12 servings and excluding optional butter/Parmesan toppings:
| Nutrition | Approx. per slice |
|---|---|
| Calories | 130–160 kcal |
| Carbohydrates | 25–28 g |
| Protein | 4–5 g |
| Fat | 2–4 g |
| Fiber | 1–2 g |
| Sugar | <1 g |
| Sodium | 250–350 mg |
Actual nutrition varies considerably depending on the flour, amount of oil, salt and toppings. One published garlic-herb no-knead recipe, for example, reports about 89 calories per serving using a different serving size and ingredient formulation, so nutrition numbers from recipes shouldn’t be treated as exact.
❓ Recipe Q&A
Why is my dough so sticky?
That’s normal.
This is a high-hydration no-knead dough. Don’t keep adding flour until it becomes dry.
Use flour on your hands and work surface instead.
Can I use active dry yeast?
Yes.
If using active dry yeast, you can dissolve it in some of the lukewarm water first and let it sit for about 5 minutes before mixing. Instant yeast can generally be mixed directly with the flour.
Can I use bread flour?
Yes—and it’s an excellent choice.
Bread flour can give you a slightly chewier loaf.
All-purpose flour works perfectly well too.
Can I use whole-wheat flour?
Yes, but don’t replace all the flour initially.
Try:
- 300 g all-purpose/bread flour
- 75 g whole-wheat flour
You may need a little additional water because whole-wheat flour absorbs more.
Can I use dried herbs?
Absolutely.
Try:
- 1 tsp dried rosemary
- 1 tsp dried thyme
- 1 tsp Italian seasoning
Fresh herbs give a brighter flavor, while dried herbs are more concentrated.
Can I add cheese?
Yes.
Excellent choices include:
- Parmesan
- Asiago
- Cheddar
- Gruyère
- mozzarella
For a strong garlic-Parmesan loaf, add 50–75 g grated Parmesan during shaping.
Can I add cheese and garlic to the top?
Yes, but be careful.
Cheese on the exterior can brown quickly. Add Parmesan during the final part of baking if necessary.
Can I add onion?
Yes.
Use:
- caramelized onion
- dried onion flakes
- roasted onion
Avoid adding a large quantity of raw onion because it adds additional moisture.
Can I add jalapeños?
Definitely.
For a spicy version, add:
- 1–2 chopped jalapeños
- 50 g cheddar
- garlic
- rosemary
Can I make it without a Dutch oven?
Yes.
Place the shaped dough on a parchment-lined baking sheet.
Put a metal pan on the bottom rack and carefully add hot water when the bread goes into the oven to create steam.
However, the Dutch oven method is easier for getting that thick, crisp crust.
Can I use a cast-iron Dutch oven?
Yes.
A 4–6 quart Dutch oven is suitable for this quantity.
Why do I need to preheat the Dutch oven?
The very hot cooking vessel gives the dough a strong initial burst of heat.
The lid traps moisture released by the dough, essentially creating a steamy environment during the first part of baking. That’s one of the reasons no-knead Dutch-oven bread develops such a crisp crust.
Why is my bread dense?
Usually one of these:
- The yeast was old.
- The dough didn’t ferment long enough.
- Your kitchen was very cold.
- Too much flour was added during shaping.
- The dough was overworked.
- The loaf was cut while still hot.
Why didn’t my bread rise?
Check your yeast first.
Also remember that ½ teaspoon yeast is intentionally a small amount because this recipe relies on a long fermentation.
If you want a faster version, use approximately 1–2 teaspoons yeast and allow a shorter rise.
Why is the center gummy?
Possible causes:
- underbaking
- loaf was too large/thick
- too much water
- bread was sliced while hot
Bake until properly browned and, ideally, check the center temperature.
Why is the crust too hard?
Bake the uncovered portion for less time.
You can also brush the finished loaf lightly with butter and allow it to cool under a clean towel.
Why is the crust pale?
Give it another 5–10 minutes uncovered.
A little olive oil or butter brushed over the surface also encourages browning.
Can I leave the dough overnight?
Yes—that’s one of the main advantages of this recipe.
Mix it in the evening and bake the next morning.
A 12–18-hour room-temperature fermentation is commonly used for this type of no-knead loa
Can I refrigerate the dough?
Yes.
After the initial rise, refrigerate it if you need to delay baking.
Bring it out, shape it, and allow it to become puffy before baking.
How should I store the finished bread?
For best crust, store it at room temperature in a paper bag or loosely wrapped.
Avoid sealing a still-warm loaf in plastic because the trapped moisture softens the crust.
For longer storage, slice and freeze it.
How long does it last?
For best quality, eat it within 1–2 days.
Some recipes recommend keeping it wrapped at room temperature for up to about 3 days, although the crust gradually loses its crispness.
Can I freeze it?
Yes.
Let the loaf cool completely, slice it, and freeze the slices in an airtight freezer bag.
You can toast individual slices directly from frozen.
My recommended version for the exact look in your photo
Use:
375 g flour
360 g water
½ tsp instant yeast
1½ tsp salt
1 tbsp olive oil
5 garlic cloves
1 tbsp rosemary
1 tbsp thyme
Then:
12–18 hour rise → shape → 45 minute rest → 450°F Dutch oven → 30 min covered → 12–15 min uncovered → cool 30–45 min.
For the beautiful topping, brush with olive oil, then add fresh rosemary + thyme + flaky salt immediately before baking.
That should get you very close to the golden, rustic, herb-covered loaf shown in your picture.