
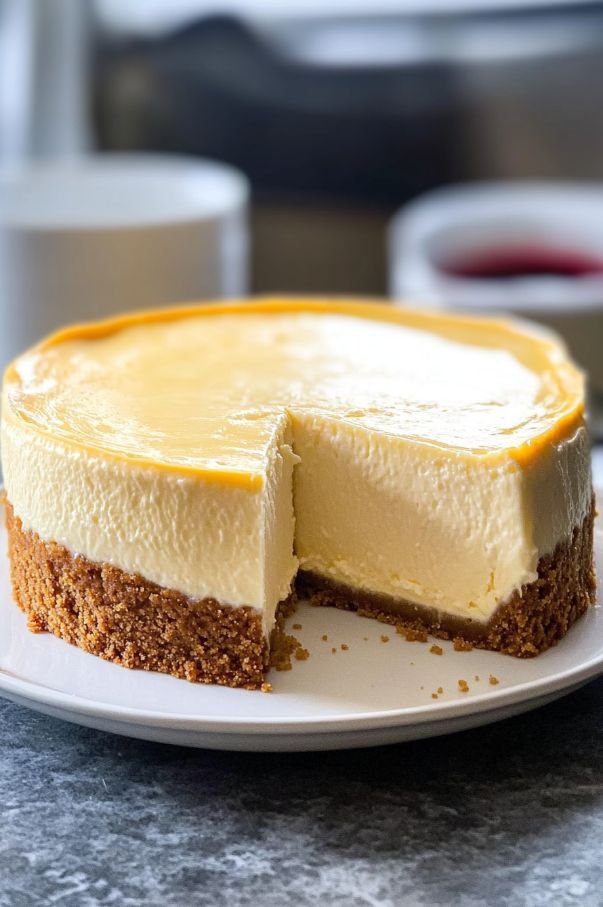
A timeless baked cheesecake with a buttery graham cracker crust and an ultra-creamy, smooth filling. The secret to a beautiful cheesecake is gentle mixing, moderate baking, and slow cooling. The result is rich and velvety in the center with a lightly golden top and a crisp, buttery crust.
Recipe Overview
This classic cheesecake is rich without being overly sweet, with a perfectly balanced combination of cream cheese, vanilla, lemon, and a buttery biscuit crust.
It is ideal for birthdays, holidays, dinner parties, or whenever you want a traditional bakery-style cheesecake.
Recipe Details
| Category | Details |
|---|---|
| Prep Time | 25 minutes |
| Bake Time | 55–70 minutes |
| Cooling Time | 1–2 hours |
| Chill Time | 6 hours or overnight |
| Total Time | About 8 hours |
| Servings | 10–12 |
| Difficulty | Moderate |
| Course | Dessert |
| Cuisine | American |
| Method | Baked |
Ingredients
For the Crust
- 2 cups graham cracker crumbs
- 5 tablespoons unsalted butter, melted
- 2 tablespoons granulated sugar
- 1/4 teaspoon salt
For the Cheesecake Filling
- 32 oz full-fat cream cheese, softened to room temperature
- 1 cup granulated sugar
- 1 tablespoon cornstarch
- 1 cup full-fat sour cream, room temperature
- 4 large eggs, room temperature
- 2 teaspoons pure vanilla extract
- 1 tablespoon fresh lemon juice
- 1 teaspoon finely grated lemon zest
- 1/4 teaspoon salt
Optional Topping
- Fresh strawberries
- Blueberries
- Raspberries
- Strawberry or raspberry sauce
- Whipped cream
- Powdered sugar
- Lemon zest
Equipment
- 9-inch springform pan
- Large mixing bowl
- Electric hand mixer or stand mixer
- Food processor, if making crumbs
- Measuring cups and spoons
- Rubber spatula
- Roasting pan or larger baking pan, optional for a water bath
- Aluminum foil
- Cooling rack
- Sharp knife
Detailed Step-by-Step Instructions
Step 1: Bring Ingredients to Room Temperature
Before starting, allow the cream cheese, sour cream, and eggs to come to room temperature.
This is extremely important for a smooth cheesecake.
Cold cream cheese can remain lumpy, while cold eggs can make the batter harder to combine evenly.
Allow the cream cheese to sit out for approximately 45–60 minutes.
Step 2: Prepare the Oven
Preheat the oven to 325°F (165°C).
Place an oven rack in the center position.
Avoid using a very high oven temperature because cheesecake benefits from slow, gentle baking.
Step 3: Prepare the Springform Pan
Lightly grease the bottom and sides of a 9-inch springform pan.
If using a water bath, wrap the outside bottom and sides of the pan tightly with 2–3 layers of heavy-duty aluminum foil.
Make sure there are no gaps where water could enter.
Step 4: Make the Graham Cracker Crust
Combine the graham cracker crumbs, melted butter, sugar, and salt.
Mix until all the crumbs are evenly coated and the mixture resembles damp sand.
Press the mixture firmly into the bottom of the springform pan.
You can use the bottom of a measuring cup or flat glass to create an even layer.
For a slightly thicker crust, press some of the mixture about 1 inch up the sides.
Step 5: Pre-Bake the Crust
Bake the crust for approximately 10 minutes at 325°F (165°C).
Remove it from the oven and allow it to cool slightly while preparing the filling.
Pre-baking helps the crust remain firm rather than becoming soft underneath the cheesecake.
Step 6: Beat the Cream Cheese
Place the softened cream cheese in a large mixing bowl.
Beat on low to medium-low speed until smooth and creamy.
Scrape down the sides of the bowl.
Do not whip the cream cheese aggressively.
The goal is smoothness, not incorporating lots of air.
Step 7: Add the Sugar and Cornstarch
Add the sugar and cornstarch.
Mix on low speed until just combined.
Scrape the sides and bottom of the bowl to ensure there are no pockets of cream cheese or sugar.
Step 8: Add the Sour Cream
Add the sour cream, vanilla extract, lemon juice, lemon zest, and salt.
Mix gently until smooth.
The lemon does not make the cheesecake taste strongly lemony. Instead, it helps balance the richness of the cream cheese.
Step 9: Add the Eggs
Add the eggs one at a time.
Mix on low speed just until each egg disappears into the batter before adding the next.
Do not overmix.
Overmixing incorporates excess air, which can cause the cheesecake to puff dramatically in the oven and then collapse or crack as it cools.
Step 10: Check the Batter
Scrape the bowl one final time and gently fold the mixture with a spatula.
The finished batter should be:
- Completely smooth
- Thick
- Creamy
- Glossy
- Free of visible cream cheese lumps
If you notice small lumps, allow the batter to sit for a few minutes and gently stir again.
Step 11: Pour Into the Crust
Pour the cheesecake batter over the cooled crust.
Smooth the surface with a spatula.
Gently tap the pan against the countertop a couple of times to release any large air bubbles.
Do not hit it aggressively.
Step 12: Bake the Cheesecake
Place the cheesecake in the center of the oven.
With a Water Bath
Place the foil-wrapped springform pan inside a larger roasting pan.
Carefully pour hot water into the roasting pan until it reaches approximately halfway up the sides of the springform pan.
Bake for approximately 60–70 minutes.
Without a Water Bath
Place the cheesecake directly on the center oven rack.
Bake for approximately 55–65 minutes.
The cheesecake is ready when the edges are set but the center still has a gentle wobble.
Do not wait until the entire cheesecake looks completely firm.
Step 13: Check for Doneness
The outer 2–3 inches should look set.
The center should jiggle slightly when the pan is gently moved.
Think of it as a soft, controlled wobble rather than a liquid movement.
The internal temperature, if using a thermometer, should generally be around 150–155°F (65–68°C) in the center.
Step 14: Turn Off the Oven
Once baked, turn off the oven.
Crack the oven door open slightly.
Leave the cheesecake inside for approximately 30–60 minutes.
This gradual temperature change helps reduce the chance of cracking.
Step 15: Cool Completely
Remove the cheesecake from the oven.
Place it on a cooling rack and allow it to cool to room temperature.
Do not immediately place a very hot cheesecake into the refrigerator.
Once cooled, cover it loosely.
Step 16: Refrigerate
Refrigerate for at least 6 hours, preferably overnight.
This step is essential.
The cheesecake continues to firm as it chills, and the flavor becomes richer and more developed.
Step 17: Remove From the Pan
Before releasing the springform pan, carefully run a thin knife around the edge of the cheesecake.
Release the springform sides slowly.
For the cleanest slices, chill the cheesecake thoroughly before cutting.
Step 18: Slice and Serve
Use a sharp knife.
For professional-looking slices, dip the knife in hot water, wipe it dry, and cut.
Clean the knife between slices.
Serve plain or with your favorite topping.
Taste and Texture
A properly baked classic cheesecake should have:
- A rich cream cheese flavor
- Mild sweetness
- Slight tang from sour cream
- Subtle vanilla
- A hint of lemon
- Buttery graham cracker crust
- Smooth, dense, creamy filling
The center should be rich and silky rather than dry or cakey.
Classic Cheesecake Topping Ideas
Fresh Berry Cheesecake
Top with strawberries, blueberries, raspberries, and blackberries.
Strawberry Cheesecake
Spoon homemade strawberry sauce over each slice and finish with fresh strawberries.
Raspberry Cheesecake
Use warm raspberry sauce with a few fresh raspberries.
Chocolate Cheesecake
Add chocolate shavings or a thin drizzle of chocolate sauce.
Caramel Cheesecake
Drizzle each slice with homemade or prepared caramel sauce and sprinkle lightly with chopped pecans.
Lemon Cheesecake
Add extra lemon zest and a thin layer of lemon curd.
Variations
New York-Style Cheesecake
For an especially dense and rich cheesecake, use full-fat cream cheese, sour cream, and a water bath.
Keep the filling simple and avoid excessive toppings.
Vanilla Bean Cheesecake
Replace some of the vanilla extract with the seeds from one vanilla bean.
This creates a more pronounced vanilla flavor.
Chocolate Chip Cheesecake
Fold approximately 1/2 cup mini chocolate chips into the finished batter before pouring it into the crust.
Cinnamon Cheesecake
Add 1 teaspoon ground cinnamon to the crust.
You can also add a small pinch of cinnamon to the filling.
Oreo-Style Cheesecake
Replace the graham crackers with finely crushed chocolate sandwich cookies.
Reduce or omit the additional sugar in the crust depending on how sweet the cookies are.
High-Protein Version
For a higher-protein cheesecake, replace part of the sour cream with thick Greek yogurt.
A good variation is:
- 32 oz reduced-fat or full-fat cream cheese
- 1 cup plain Greek yogurt
- 4 eggs
- Vanilla protein powder, optional
Be careful with adding protein powder because too much can make the cheesecake dense or slightly chalky.
Lighter Version
For a lighter cheesecake:
- Use reduced-fat cream cheese.
- Use nonfat or low-fat Greek yogurt instead of some sour cream.
- Reduce the crust slightly.
- Use a smaller amount of sugar.
The texture will be somewhat less rich than the classic full-fat version.
Lower-Sugar Version
Replace some or all of the granulated sugar with a baking-friendly sugar substitute.
Allulose tends to work particularly well in creamy baked desserts.
Keep in mind that different sweeteners vary in sweetness and baking behavior.
Gluten-Free Version
Use gluten-free graham crackers or gluten-free digestive-style biscuits for the crust.
The cheesecake filling itself is naturally gluten-free when all packaged ingredients are gluten-free.
Check labels on cream cheese, sour cream, flavorings, and toppings if strict gluten avoidance is required.
Make-Ahead Instructions
Cheesecake is one of the best make-ahead desserts.
You can prepare it 1–2 days before serving.
In fact, overnight refrigeration usually improves the texture.
Keep it covered in the refrigerator until ready to serve.
For a party, make the cheesecake the day before and add toppings shortly before serving.
Storage
Refrigerator
Store tightly covered for approximately 4–5 days.
Keep the cheesecake refrigerated whenever it is not being served.
Freezer
Cheesecake freezes very well.
For best results:
- Chill the cheesecake completely.
- Slice it into individual portions if desired.
- Wrap each piece tightly in plastic wrap.
- Place wrapped pieces into a freezer-safe container or bag.
- Freeze for up to approximately 1–2 months for best quality.
Thaw overnight in the refrigerator.
Add fresh toppings after thawing.
Approximate Nutrition
Based on 12 servings and without optional toppings:
- Calories: approximately 430–480
- Protein: approximately 7–9 g
- Carbohydrates: approximately 35–40 g
- Fat: approximately 29–32 g
- Sugar: approximately 24–28 g
These values are estimates and will vary depending on the exact cream cheese, biscuits, sugar, butter, and serving size used.
WW-Friendly Tips
Classic cheesecake is naturally a higher-point dessert because of the cream cheese, butter, sugar, and crust.
For a lighter version:
- Use reduced-fat cream cheese.
- Replace some sour cream with nonfat Greek yogurt.
- Make a thinner crust.
- Reduce the sugar using a suitable zero-calorie sweetener.
- Serve smaller slices with fresh berries.
The exact WW Points value depends on your specific ingredients and the current WW program, so calculate it using the exact products you use.
Frequently Asked Questions
Why did my cheesecake crack?
Cracking can happen because of overmixing, overbaking, sudden temperature changes, or opening the oven repeatedly.
A water bath and slow cooling can significantly reduce the risk.
Can I make cheesecake without a water bath?
Yes.
A water bath is helpful but not mandatory.
If you skip it, bake gently and avoid overbaking.
How do I know when cheesecake is done?
The edges should be set while the center should still have a gentle wobble.
It should not look completely firm in the middle while still in the oven.
Why is my cheesecake not creamy?
Common causes include overbaking, using cold ingredients, or overmixing the batter.
Room-temperature ingredients and gentle baking are key.
Why is the cheesecake grainy?
The cream cheese may not have been softened properly, or the cheesecake may have been overbaked.
Use room-temperature ingredients and mix until smooth without excessive whipping.
Can I use a regular cake pan?
A springform pan is strongly recommended because it makes removing the cheesecake much easier.
Can I make this without lemon?
Yes.
The lemon adds brightness and balances the richness, but it can be omitted if desired.
Can I use mascarpone?
Yes, but it will create a softer, richer, less tangy cheesecake.
You can replace a portion of the cream cheese with mascarpone.
Can I make mini cheesecakes?
Absolutely.
Divide the crust and filling among lined muffin cups.
Reduce the baking time substantially and begin checking them after approximately 18–25 minutes.
Why does my cheesecake sink?
A small amount of sinking is normal.
Significant sinking usually comes from overmixing, overbaking, or cooling too quickly.
Troubleshooting
Cheesecake is too soft
Refrigerate it longer.
If it is still very soft after a full overnight chill, it may have been underbaked.
Cheesecake is dry
It was likely overbaked.
Next time, remove it while the center still has a gentle wobble.
Crust is falling apart
The crumbs may not have contained enough butter, or the crust was not pressed firmly enough.
Make sure the crumbs are evenly coated with melted butter.
Crust is too hard
It may have been packed too firmly or overbaked.
Press it firmly but don’t compress it excessively.
Top is browned too much
The oven may be running hot.
Use an oven thermometer if possible and consider loosely covering the cheesecake with foil toward the end of baking.
Cheesecake sticks to the pan
Run a thin knife around the edge before releasing the springform pan.
Cooling the cheesecake completely also helps.
Chef’s Tips for Perfect Cheesecake
- Use full-fat cream cheese for the classic texture.
- Never start with cold cream cheese.
- Mix gently once the eggs are added.
- Don’t overbeat the batter.
- Scrape the bowl frequently while mixing.
- Bake at a moderate temperature.
- A water bath gives the most reliable creamy texture.
- Don’t open the oven repeatedly.
- Don’t wait for the center to become completely firm.
- Cool gradually.
- Refrigerate overnight whenever possible.
- Use a hot, clean knife for beautiful slices.
- Add fruit sauces immediately before serving.
- Don’t worry about a small crack—toppings can easily hide it.
Serving and Presentation Ideas
For an elegant presentation, place one chilled slice on a dessert plate.
Add a few fresh strawberries or raspberries beside it.
Drizzle a small amount of berry sauce across the plate and finish with a little lemon zest.
For a restaurant-style presentation, keep the cheesecake itself simple and use the topping sparingly.
A classic cheesecake is also excellent served completely plain with a cup of coffee or tea.
Final Notes
The most important factors in a Classic Creamy Cheesecake are room-temperature ingredients, gentle mixing, controlled baking, and plenty of chilling time.
Don’t rush the cooling process or slice the cheesecake while it is warm. The filling becomes noticeably creamier and more stable after several hours in the refrigerator.