
Introduction
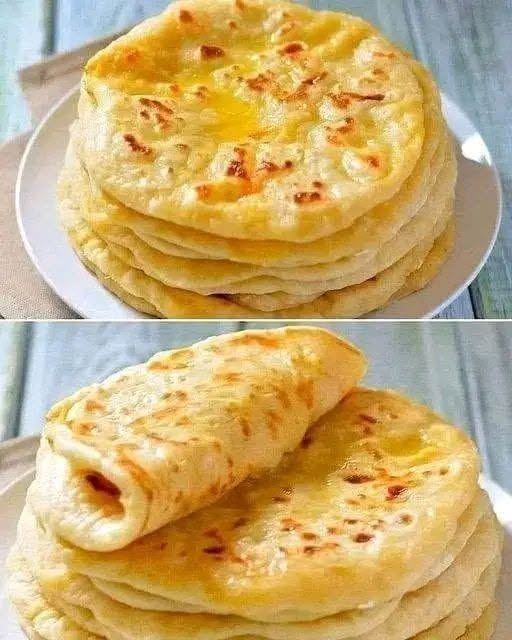
Homemade layered paratha is a delicious, soft, golden-brown flatbread with beautiful flaky layers and a rich buttery taste. It is prepared using simple kitchen ingredients such as all-purpose flour, wheat flour, salt, oil, water and butter or ghee.
These parathas are slightly crispy on the outside while remaining soft, tender and flaky inside. The layers separate beautifully when the paratha is folded or torn by hand. They are perfect for breakfast, lunch, dinner or evening tea.
This recipe explains how to prepare restaurant-style layered parathas at home using a simple dough-making, rolling, folding and pan-cooking method.
Preparation time: 25 minutes
Resting time: 30–40 minutes
Cooking time: 25–30 minutes
Total time: Approximately 1 hour 30 minutes
Servings: 6–8 parathas
Difficulty level: Easy to medium
Cooking method: Stovetop / frying pan
Ingredients
For the dough
2 cups all-purpose flour (maida)
1 cup whole wheat flour (atta)
½ teaspoon salt
1 teaspoon sugar (optional)
2 tablespoons cooking oil
¾ to 1 cup lukewarm water (as needed)
2 tablespoons plain yogurt (optional, for extra softness)
For layering
4 tablespoons melted butter or desi ghee
3 tablespoons dry flour for dusting
1 tablespoon cooking oil
1 tablespoon cornflour (optional, for helping separate the layers)
For cooking
3–4 tablespoons ghee or cooking oil
Extra butter for brushing (optional)
Detailed Preparation Method
Step 1: Prepare the flour mixture
Take a large mixing bowl and add 2 cups of all-purpose flour and 1 cup of whole wheat flour.
Add salt and sugar. Mix all the dry ingredients thoroughly using a spoon or your hands.
Now add 2 tablespoons of cooking oil and rub it into the flour until the mixture becomes slightly crumbly.
If you want softer and more tender parathas, add 2 tablespoons of plain yogurt.
Step 2: Prepare the dough
Gradually add lukewarm water to the flour mixture.
Start mixing with your fingers until the flour comes together. Add water little by little rather than pouring it all at once.
Knead the mixture until you get a smooth, soft and slightly elastic dough.
The dough should not be too hard or too sticky. A soft dough helps create tender, flaky parathas.
Knead for approximately 8–10 minutes.
Apply a little oil over the dough and cover the bowl with a clean kitchen towel or plate.
Leave it to rest for 30–40 minutes.
Important tip: Resting the dough makes it easier to roll and fold. It also helps produce softer parathas.
Step 3: Divide the dough
After resting, uncover the dough and knead it gently for another minute.
Divide it into 6–8 equal-sized portions.
Roll each portion between your palms to form a smooth ball.
Apply a little oil to prevent the dough balls from drying out.
Cover them while preparing the layered parathas.
Step 4: Roll the dough into a thin sheet
Take one dough ball and place it on a clean, lightly floured working surface.
Using a rolling pin, gently roll it into a thin circular or slightly oval-shaped sheet.
Try to make the sheet as thin as possible without tearing it.
Brush a thin layer of melted ghee or butter over the entire surface.
Sprinkle a little dry flour or cornflour evenly over the buttered surface.
This step is important because the fat and flour help separate the layers during cooking.
Step 5: Create the beautiful layers
There are two easy ways to create flaky layers.
Method A: Fan-folding technique
Starting from one side, fold the thin sheet back and forth like a paper fan.
Continue folding until you have a long strip.
Gently stretch the strip slightly.
Hold one end and roll the strip into a spiral.
Tuck the loose end underneath the spiral.
Press gently to secure it.
Method B: Spiral rolling technique
Brush the rolled dough sheet with ghee.
Cut the sheet into thin strips.
Stack or gather the strips carefully.
Roll them into a spiral shape.
Tuck the end underneath.
Both techniques help create attractive, flaky layers.
Step 6: Rest the layered dough balls
Prepare the remaining dough balls using the same technique.
Place the folded dough balls on a plate.
Cover them and let them rest for another 10–15 minutes.
This short resting period helps the dough relax and makes the next rolling step easier.
Step 7: Roll into round parathas
Take one prepared spiral dough ball.
Dust your working surface with a little flour.
Gently press the dough ball and roll it into a medium-thick circular paratha.
Do not press too hard because excessive pressure can destroy the layers.
Try to maintain an even thickness throughout.
The paratha should be neither too thin nor too thick.
Repeat with the remaining dough balls.
Step 8: Heat the frying pan
Place a flat frying pan or tawa over medium heat.
Allow it to become properly warm.
Place one rolled paratha onto the hot pan.
Cook for approximately 30–45 seconds until small bubbles begin to appear on the surface.
Flip it carefully.
Step 9: Cook until golden brown
Spread a little ghee or cooking oil over the upper surface.
Flip again and apply a little ghee to the other side.
Cook on medium heat, pressing gently with a spatula around the edges.
Continue flipping until both sides become golden brown with beautiful light-brown spots.
The paratha should be cooked properly inside while remaining soft and flaky.
Avoid cooking over very high heat because the outside may burn before the inside is cooked.
Step 10: Separate the layers
Remove the cooked paratha from the pan.
Place it between your palms and gently clap or press the edges to loosen the layers.
You can also gently crush the paratha between your hands while it is still warm.
This helps the layers separate and gives the paratha its beautiful flaky texture.
Brush with a little butter if desired.
Your homemade soft and flaky layered paratha is ready to serve!
Serving Suggestions
Best ways to enjoy your parathas
Serve hot with chicken curry.
Enjoy with creamy white chicken karahi.
Serve with spicy chickpea curry.
Pair with daal or vegetable curry.
Enjoy with plain yogurt and mint chutney.
Serve with omelette or scrambled eggs for breakfast.
Pair with homemade pickle and a cup of hot tea.
Important Tips for Perfect Layered Parathas
Use soft dough: Hard dough produces tough and chewy parathas.
Allow enough resting time: Resting makes rolling easier and improves texture.
Use enough ghee: A thin coating of ghee between layers helps create a flaky texture.
Roll gently: Excessive pressure can flatten the layers.
Maintain medium heat: This allows the paratha to cook evenly.
Do not overcook: Overcooking can make the parathas dry and hard.
Separate while warm: Gently loosening the layers while warm gives a better texture.
Keep dough covered: Uncovered dough can become dry and develop a crust.
Nutrition Information
Estimated Nutrition
The following nutritional information is an estimate for one medium-sized paratha, assuming the recipe makes 8 parathas and uses a moderate amount of cooking fat.
Nutrient
Approximate amount
Calories
230–280 kcal
Carbohydrates
35–40 g
Protein
5–7 g
Total fat
8–12 g
Saturated fat
3–5 g
Dietary fibre
2–3 g
Sugar
1–2 g
Sodium
150–220 mg
Actual nutritional values depend on the flour brands, paratha size and quantity of butter, ghee or oil used.
Nutritional Benefits
Carbohydrates: Flour provides energy for everyday activities.
Protein: Wheat flour contributes a small amount of plant-based protein.
Dietary fibre: Whole wheat flour provides fibre that supports digestive health.
Fats: Butter and ghee provide energy and contribute to the rich flavour and flaky texture.
Allergy and Nut Information
Nuts: This recipe does not require peanuts, almonds, cashews, walnuts or other tree nuts.
Gluten: Contains gluten from wheat flour and all-purpose flour.
Dairy: Contains dairy if butter, ghee or yogurt is used.
Soy: Not intentionally included, but check packaged ingredients for possible soy additives.
Eggs: No eggs are required.
Vegetarian: Suitable for a vegetarian diet when prepared with vegetarian ingredients.
Nut allergy precaution: Although the recipe contains no added nuts, check flour, butter and other packaged ingredients for cross-contamination warnings. Use vegetable oil instead of butter or ghee if you need a dairy-free version.
Storage Instructions
At room temperature: Keep freshly cooked parathas covered for a short period and serve warm.
In the refrigerator: Allow the cooked parathas to cool completely. Store in an airtight container with parchment paper between them. Refrigerate for up to 2–3 days.
In the freezer: Place parchment paper between individual cooled parathas and store in a freezer-safe bag or container for up to 1–2 months for best quality.
Reheating: Heat on a tawa over medium-low heat. Add a few drops of ghee if desired. Flip until heated thoroughly and slightly crisp.
Frequently Asked Questions (Q&A)
Q1: Why are my parathas not becoming flaky?
There may not be enough butter or ghee between the layers. Also, pressing too hard while rolling can flatten the folds. Use a light hand and apply a thin layer of fat between the folds.
Q2: Can I make these parathas using only whole wheat flour?
Yes. You can use 3 cups of whole wheat flour instead of mixing it with all-purpose flour. The texture will be slightly denser but still delicious.
Q3: Can I use milk instead of water?
Yes. You can replace some of the water with milk to make the dough softer and give the parathas a slightly richer taste.
Q4: Why are my parathas hard after cooking?
Common reasons include using stiff dough, insufficient resting time, excessive flour during rolling or cooking at very high heat. Make a soft dough and avoid overcooking.
Q5: Can I prepare the dough one day in advance?
Yes. Store the dough in an airtight container in the refrigerator. Use it within approximately 24 hours for the best results. Bring it closer to room temperature before rolling.
Q6: Can I make these parathas without ghee?
Yes. You can use sunflower oil, canola oil or another suitable cooking oil. The flavour and texture may differ slightly.
Q7: How can I make the parathas extra soft?
Use a soft dough, add a little yogurt if desired, allow sufficient resting time and avoid cooking for too long.
Q8: Why do the parathas shrink while rolling?
The gluten in the dough may be too tight. Cover the dough and let it rest for another 10–15 minutes before rolling again.
Q9: Can I freeze uncooked layered parathas?
Yes. Roll and prepare the layered parathas, place parchment paper between them and freeze in a sealed container. Cook directly from frozen over medium-low heat, adding a little extra cooking time.
Q10: Can I make these parathas without all-purpose flour?
Yes. Whole wheat flour works well. You may need to adjust the water slightly to achieve a soft, manageable dough.
Q11: Can I add cheese to this recipe?
Yes. Add grated mozzarella or cheddar cheese before folding the dough into a spiral. Avoid adding too much filling because it may come out during rolling.
Q12: How do I know when the paratha is fully cooked?
Both sides should have golden-brown spots, and the centre should no longer look raw or doughy. Cook evenly over medium heat.
Q13: Are these parathas suitable for breakfast?
Yes. They make a filling breakfast when served with yogurt, eggs, tea or a vegetable curry.
Q14: Can I make them vegan?
Yes. Use water instead of milk, omit yogurt and replace butter or ghee with plant-based cooking oil or vegan butter.
Q15: How can I get the same appearance as restaurant-style layered parathas?
Roll the dough thinly, apply ghee evenly, use the fan-folding technique, roll into a spiral and then gently flatten. Cook on a properly heated tawa until golden.
Final Recipe Notes
The secret to delicious homemade layered parathas is a soft dough, proper resting, generous but controlled layering and gentle cooking. Do not rush the preparation process. Each step contributes to the final texture.
These parathas are best enjoyed fresh and hot, when their golden exterior is slightly crisp and their inside is soft, buttery and beautifully layered.