
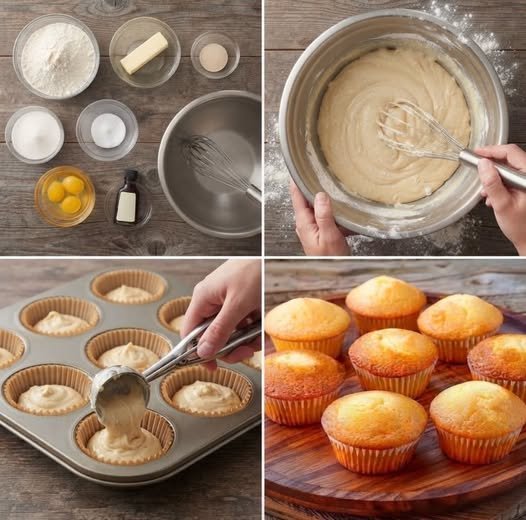
Soft, fluffy, moist, and buttery homemade vanilla cupcakes with a delicate golden top and a delicious sweet vanilla flavor. These easy bakery-style cupcakes are made with simple pantry ingredients and are perfect for birthdays, parties, afternoon treats, or everyday baking.
Easy
Beginner-Friendly
Nut-Free Ingredients
Prep: 15 minutes
Bake: 18–22 minutes
Total: 40 minutes
Servings: 12 cupcakes
Ingredients
1½ cups (190 g) all-purpose flour
½ cup (115 g) unsalted butter, softened
¾ cup (150 g) granulated sugar
2 large eggs, room temperature
½ cup (120 ml) whole milk, room temperature
2 teaspoons pure vanilla extract
1½ teaspoons baking powder
¼ teaspoon baking soda
¼ teaspoon salt
Instructions
Step 1: Prepare the Oven and Cupcake Pan
Preheat your oven to 350°F (175°C). Line a 12-cup muffin pan with paper cupcake liners. Lightly grease the liners if desired to make removing the cupcakes easier.
Measure all the ingredients and allow the butter, eggs, and milk to come to room temperature for a smooth, evenly mixed batter.
Step 2: Mix the Dry Ingredients
In a medium-sized mixing bowl, whisk together the all-purpose flour, baking powder, baking soda, and salt until evenly combined.
Set the bowl aside. Mixing the dry ingredients first helps distribute the leavening agents evenly throughout the batter.
Step 3: Cream the Butter and Sugar
In a large mixing bowl, beat the softened butter and granulated sugar using an electric mixer on medium speed for about 2–3 minutes, until the mixture becomes pale, light, and fluffy.
Scrape down the sides of the bowl as needed. Properly creaming the butter and sugar helps create a soft, airy cupcake texture.
Step 4: Add the Eggs and Vanilla
Add the eggs one at a time, beating well after each addition. Pour in the vanilla extract and mix until fully incorporated.
If the mixture looks slightly curdled, don’t worry. Adding the dry ingredients gradually will help bring the batter together.
Step 5: Combine the Wet and Dry Ingredients
Reduce the mixer speed to low. Add about one-third of the dry ingredients to the butter mixture and mix gently.
Pour in half of the milk and mix until just combined. Repeat with another third of the dry ingredients, the remaining milk, and then the final portion of the dry ingredients.
Mix only until no visible streaks of flour remain. Avoid overmixing, as it can make the cupcakes dense or tough.
Step 6: Fill the Cupcake Liners
Divide the batter evenly among the 12 prepared cupcake liners, filling each approximately two-thirds full.
Use a spoon or ice cream scoop to distribute the batter evenly, helping the cupcakes bake to a consistent size.
Step 7: Bake the Cupcakes
Place the muffin pan on the center rack of the preheated oven. Bake for 18–22 minutes, or until the cupcake tops are lightly golden and a toothpick inserted into the center comes out clean or with a few moist crumbs.
Avoid opening the oven door too early, as sudden temperature changes can affect how the cupcakes rise.
Step 8: Cool Completely
Remove the cupcakes from the oven and allow them to cool in the pan for about 5 minutes.
Transfer them carefully to a wire cooling rack and let them cool completely before adding frosting or serving.
Step 9: Decorate and Serve
Enjoy the cupcakes plain for a simple vanilla treat, or decorate with buttercream frosting, whipped cream, sprinkles, or fresh fruit.
Optional Vanilla Buttercream Frosting
Ingredients
½ cup (115 g) unsalted butter, softened
2 cups (240 g) powdered sugar
1–2 tablespoons milk or heavy cream
1 teaspoon vanilla extract
A pinch of salt
Method
Beat the softened butter with an electric mixer for 2–3 minutes until creamy and smooth.
Gradually add the powdered sugar, mixing on low speed to prevent it from scattering.
Add vanilla extract, a pinch of salt, and 1 tablespoon of milk or cream.
Beat for another 2–3 minutes until light and fluffy. Add a little more milk if needed to achieve a pipeable consistency.
Once the cupcakes are completely cool, pipe or spread the frosting over each cupcake and decorate as desired.
Cooking Tips
Use room-temperature ingredients: Room-temperature eggs, butter, and milk combine more evenly and help create a smooth batter.
Measure flour correctly: Spoon the flour into the measuring cup and level it off rather than packing it tightly.
Don’t overmix: Mix just until the flour disappears to keep the cupcakes light and tender.
Fill evenly: Fill each liner about two-thirds full to allow the cupcakes to rise without overflowing.
Check for doneness: Use a toothpick to test the center of a cupcake near the end of the baking time.
Avoid overbaking: Remove the cupcakes as soon as they’re cooked through to preserve their moisture.
Cool before frosting: Warm cupcakes can melt the buttercream, so let them cool completely first.
Serving Suggestions
Serve with a cup of tea, coffee, or cold milk.
Top with vanilla buttercream and colorful sprinkles for birthday parties.
Add fresh strawberries, raspberries, or blueberries for a fruity touch.
Drizzle with melted chocolate or caramel sauce for an indulgent dessert.
Serve with whipped cream and fresh fruit for a light dessert.
Decorate with themed frosting for celebrations, baby showers, or family gatherings.
Storage Instructions
Room temperature: Store unfrosted or buttercream-frosted cupcakes in an airtight container for up to 2 days in a cool environment.
Refrigerator: Store frosted cupcakes in an airtight container for up to 4–5 days. Bring to room temperature before serving for a softer texture.
Freezer: Freeze unfrosted cupcakes in a freezer-safe container for up to 2–3 months.
Thawing: Thaw frozen cupcakes at room temperature for 1–2 hours before serving or decorating.
Nutrition Information
Approximate values per cupcake, without frosting, based on 12 cupcakes.
Nutrient
Amount
Calories
190 kcal
Protein
3 g
Carbohydrates
26 g
Total Fat
8 g
Saturated Fat
5 g
Sugar
13 g
Fiber
0.5 g
Sodium
115 mg
Cholesterol
50 mg
Nut Information
No nuts in the listed ingredients
These vanilla cupcakes are made without peanuts, tree nuts, or nut-based ingredients.
Peanuts: 0 g
Tree nuts: 0 g
Nut-based ingredients: None intentionally included
Allergy note: Although the listed recipe contains no nuts, check the labels on flour, baking ingredients, vanilla extract, frosting ingredients, and sprinkles for allergen or cross-contact warnings. If baking for someone with a severe nut allergy, use ingredients verified to be safe and avoid cross-contact with utensils, pans, and work surfaces.
Contains: Wheat (gluten), milk, and eggs.
Frequently Asked Questions
1. Why are my vanilla cupcakes dense?
Cupcakes may become dense if the batter is overmixed, the flour is packed into the measuring cup, or the butter and sugar are not creamed properly. Mix gently after adding the flour and measure ingredients carefully.
2. Can I make these cupcakes without an electric mixer?
Yes. You can use a hand whisk and a sturdy mixing bowl. Make sure the butter is softened enough to cream with the sugar, and mix the batter gently to avoid overworking it.
3. Can I use oil instead of butter?
Yes, but the texture and flavor will change. A neutral oil can make the cupcakes moist, although you will lose some of the rich buttery flavor and the lightness created by creaming butter and sugar.
4. How do I make cupcakes extra fluffy?
Use room-temperature ingredients, cream the butter and sugar until light and fluffy, measure the flour accurately, and avoid overmixing once the flour is added.
5. Can I make the cupcake batter ahead of time?
For the best rise and texture, bake the batter soon after mixing because the baking powder begins working once the wet and dry ingredients are combined. You can bake the cupcakes ahead and store them in an airtight container, then frost them shortly before serving.
Conclusion
These easy homemade vanilla cupcakes are soft, fluffy, buttery, and full of classic vanilla flavor. With simple ingredients and straightforward instructions, they’re a wonderful choice for beginner bakers and experienced home cooks alike. Enjoy them plain, add a swirl of creamy vanilla buttercream, or customize them with your favorite toppings for any occasion.