
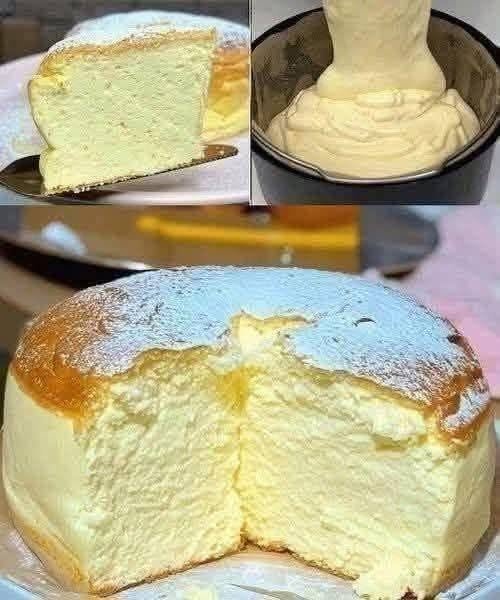
This Fluffy Japanese Cotton Cheesecake is incredibly soft, light, airy, and delicate. It has a beautiful golden top with a cloud-like, creamy interior that practically melts in your mouth.
Made with cream cheese, eggs, milk, butter, and cake flour, this cheesecake gets its signature fluffy texture from carefully whipped egg whites folded into the batter.
It’s perfect for dessert, afternoon tea, celebrations, or whenever you crave a light and delicious homemade cake!
Preparation Time: 25 minutes
Baking Time: 60–70 minutes
Cooling Time: 1 hour
Total Time: Approximately 2 hours 35 minutes
Servings: 8
Course: Dessert
Cuisine: Japanese
Ingredients
For the Cheesecake Batter
-
250 g cream cheese, softened
-
50 g unsalted butter
-
100 ml whole milk
-
6 large eggs, separated
-
60 g cake flour
-
20 g cornstarch
-
½ teaspoon vanilla extract
-
1 tablespoon lemon juice
-
¼ teaspoon salt
For the Meringue
-
120 g granulated sugar
-
¼ teaspoon cream of tartar (optional)
For Garnishing
-
Powdered sugar, for dusting
-
Fresh strawberries (optional)
-
Fresh blueberries (optional)
Instructions
Step 1: Prepare the Baking Pan
-
Preheat your oven to 320°F (160°C).
-
Take an 8-inch round cake pan, preferably with solid sides.
-
Lightly grease the inside of the pan.
-
Line the bottom with parchment paper.
-
Line the sides with parchment paper, allowing it to extend slightly above the rim.
-
Wrap the outside of the pan with two layers of aluminum foil if using a removable-bottom pan.
-
Set aside.
Step 2: Melt the Cream Cheese Mixture
-
Place a heatproof bowl over a saucepan of gently simmering water.
-
Add softened cream cheese, butter, and milk.
-
Stir continuously until everything melts together.
-
Mix until the mixture becomes completely smooth and creamy.
-
Remove the bowl from the heat.
-
Allow it to cool slightly.
Step 3: Add the Egg Yolks
-
Separate the six eggs carefully.
-
Place the egg whites in a clean mixing bowl.
-
Add the egg yolks one at a time to the cream cheese mixture.
-
Whisk after each addition until incorporated.
-
Add vanilla extract.
-
Add lemon juice and salt.
-
Whisk until the mixture becomes smooth.
Step 4: Add the Flour and Cornstarch
-
Sift the cake flour and cornstarch together.
-
Gradually add the dry ingredients to the cream cheese mixture.
-
Whisk gently until no lumps remain.
-
Avoid overmixing.
-
Strain the batter through a fine-mesh sieve for an extra-smooth texture.
-
Set aside.
Step 5: Prepare the Egg White Meringue
-
Place the egg whites in a completely clean, dry mixing bowl.
-
Add cream of tartar if using.
-
Begin beating the egg whites at medium speed.
-
Once the whites become foamy, gradually add the granulated sugar in three additions.
-
Continue beating until the meringue forms medium-soft peaks.
-
The meringue should look glossy and hold a peak that gently bends at the tip.
-
Avoid beating until very stiff, dry peaks form.
Step 6: Combine the Meringue and Cheesecake Batter
-
Add one-third of the whipped egg whites to the cream cheese batter.
-
Gently whisk to loosen the mixture.
-
Add the remaining meringue in two additions.
-
Use a silicone spatula to fold gently from the bottom of the bowl toward the top.
-
Rotate the bowl as you fold.
-
Continue until the mixture is evenly combined.
-
Avoid vigorous stirring because it can deflate the air.
-
The finished batter should be light, smooth, and fluffy.
Step 7: Pour the Batter into the Pan
-
Slowly pour the cheesecake batter into the prepared cake pan.
-
Use a spatula to smooth the surface.
-
Gently tap the pan against the counter once or twice to release large air bubbles.
-
Run a skewer through the batter gently to remove any remaining large bubbles.
-
Place the cake pan inside a larger roasting tray.
Step 8: Prepare the Water Bath
-
Carefully pour hot water into the larger roasting tray.
-
The water should reach approximately halfway up the sides of the cake pan.
-
Make sure water cannot enter the cake batter.
-
The water bath creates gentle, even heat and helps prevent the cheesecake from drying out.
Step 9: Bake the Cheesecake
-
Carefully transfer the roasting tray to the preheated oven.
-
Bake at 320°F (160°C) for approximately 20 minutes.
-
Reduce the oven temperature to 285°F (140°C).
-
Continue baking for approximately 40–50 minutes.
-
Watch the top as it becomes lightly golden.
-
The cheesecake should rise beautifully and feel gently set.
-
Turn off the oven when the cake is baked through.
Baking times vary by oven and pan size. The center should be set but still have a slight gentle wobble.
Step 10: Cool the Cheesecake Slowly
-
Turn off the oven.
-
Leave the oven door slightly open.
-
Allow the cheesecake to rest inside for approximately 15–20 minutes.
-
Carefully remove the roasting tray.
-
Remove the cake pan from the water bath.
-
Allow the cheesecake to cool at room temperature.
-
Once cooled, carefully remove it from the pan.
-
Refrigerate for at least 2 hours for easier slicing.
Step 11: Garnish and Serve
-
Place the cheesecake on a serving plate.
-
Lightly dust the top with powdered sugar.
-
Add fresh strawberries or blueberries if desired.
-
Use a sharp knife to cut clean slices.
-
Wipe the knife between cuts for a neat presentation.
-
Serve chilled or slightly cool.
Tips for the Perfect Fluffy Japanese Cheesecake
-
Use room-temperature ingredients: This helps create a smooth batter.
-
Separate eggs carefully: Even a small amount of yolk in the egg whites can prevent proper whipping.
-
Use medium-soft peaks: This gives the cheesecake its light, airy structure.
-
Fold gently: Avoid losing the air incorporated into the meringue.
-
Use a water bath: It helps the cheesecake bake evenly.
-
Don’t open the oven frequently: Sudden temperature changes can cause the cake to collapse.
-
Cool gradually: Slow cooling helps minimize shrinking and cracking.
Frequently Asked Questions (Q&A)
Q1: Why did my Japanese cheesecake collapse?
It may have been underbaked, the meringue may have been overbeaten, or the oven temperature may have changed suddenly. Gradual cooling also helps.
Q2: Can I use regular all-purpose flour instead of cake flour?
Yes! All-purpose flour can work, although cake flour generally produces a lighter, more delicate texture.
Q3: Why is my cheesecake not fluffy?
The egg whites may not have been whipped sufficiently, or the meringue may have lost too much air during folding.
Q4: Can I make this cheesecake without cornstarch?
Cornstarch helps create a delicate structure. You can replace it with an equal amount of cake flour, although the texture may be slightly different.
Q5: Can I use low-fat cream cheese?
Full-fat cream cheese is recommended for the richest flavor and best texture.
Q6: How do I know when the cheesecake is ready?
The top should be lightly golden, and the center should be set with a slight gentle wobble.
Q7: Can I make Japanese cheesecake ahead of time?
Yes! Prepare it a day ahead and refrigerate it. It is delicious after chilling.
Q8: How should I store leftovers?
Store in an airtight container in the refrigerator for up to 3 days.
Q9: Can I freeze Japanese cotton cheesecake?
Yes! Wrap individual slices tightly and freeze for up to one month. Thaw overnight in the refrigerator.
Q10: Why does my cheesecake crack on top?
Possible causes include excessive oven temperature, overbeaten egg whites, or sudden cooling.
Nutritional Information (Estimated)
Per serving, based on 8 servings.
| Nutrient | Amount |
|---|---|
| Calories | 285 kcal |
| Protein | 8 g |
| Carbohydrates | 25 g |
| Fat | 17 g |
| Fiber | 0.5 g |
| Sugar | 18 g |
Nutrition values are approximate and depend on the ingredients used.
Serving Suggestions
Serve this beautiful cheesecake with:
-
Fresh strawberries
-
Blueberries and raspberries
-
Homemade strawberry sauce
-
Whipped cream
-
Fresh mango slices
-
A light dusting of powdered sugar
-
Hot coffee or green tea
Enjoy this incredibly soft, fluffy, creamy, and cloud-like Japanese Cotton Cheesecake! ❤️