
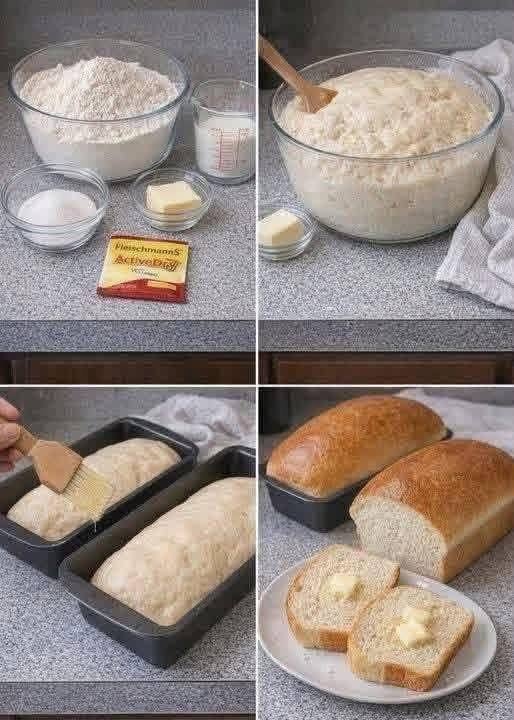
Recipe Information
– Prep Time: 25 minutes
– Rising Time: 1½–2 hours
– Baking Time: 30–35 minutes
– Total Time: Approximately 2 hours 45 minutes
– Yield: 2 medium loaves
– Difficulty: Easy
– Cuisine: Homemade American-style bread
Ingredients
– 6 cups (750 g) all-purpose flour or bread flour
– 2 cups (480 ml) warm milk (approximately 105–110°F)
– 2¼ teaspoons (1 packet) active dry yeast
– ¼ cup (50 g) granulated sugar
– 2 teaspoons salt
– ¼ cup (57 g) unsalted butter, softened
– 1 tablespoon additional butter for brushing the baked loaves
Step-by-Step Instructions
Step 1: Prepare the Yeast Mixture
1. Pour warm milk into a large mixing bowl.
2. Add granulated sugar.
3. Sprinkle active dry yeast over the milk.
4. Stir gently to combine.
5. Allow the mixture to sit for 5–10 minutes.
6. Wait until the yeast becomes foamy and bubbly.
7. This indicates that the yeast is active and ready to use.
Important: Do not use hot milk because excessive heat can kill the yeast.
Step 2: Prepare the Dough
1. Add softened butter to the yeast mixture.
2. Add salt.
3. Gradually add the flour, approximately one cup at a time.
4. Mix with a wooden spoon or dough hook.
5. Continue mixing until a rough dough forms.
6. Scrape down the sides of the bowl.
7. Make sure all the flour is incorporated.
Step 3: Knead the Dough
1. Transfer the dough onto a lightly floured surface.
2. Knead for approximately 8–10 minutes by hand.
3. Alternatively, use a stand mixer with a dough hook for 6–8 minutes.
4. Continue kneading until the dough becomes smooth, elastic and slightly tacky.
5. If the dough is extremely sticky, add flour one tablespoon at a time.
6. Avoid adding too much flour because it can make the bread dense.
Step 4: First Rise
1. Lightly grease a large bowl with butter or oil.
2. Place the dough inside.
3. Turn the dough once to coat its surface.
4. Cover with a clean kitchen towel or plastic wrap.
5. Place in a warm, draft-free location.
6. Allow it to rise for approximately 60–90 minutes.
7. The dough should double in size.
Step 5: Shape the Loaves
1. Gently punch down the risen dough.
2. Transfer it to a clean work surface.
3. Divide the dough into two equal portions.
4. Flatten each portion into a rectangle.
5. Fold the sides inward.
6. Roll the dough tightly into a loaf shape.
7. Pinch the seam closed.
8. Place each loaf seam-side down into a greased 9 × 5-inch loaf pan.
Step 6: Second Rise
1. Cover both loaf pans loosely with a clean kitchen towel.
2. Allow the dough to rise for another 30–45 minutes.
3. The dough should become puffy and rise slightly above the rims of the pans.
4. Avoid letting it overproof.
Step 7: Prepare for Baking
1. Preheat your oven to 350°F (175°C).
2. Check that both loaves have risen sufficiently.
3. If desired, gently brush the tops with a little milk for a softer finish.
4. Place the loaf pans on the middle oven rack.
Step 8: Bake the Bread
1. Bake for approximately 30–35 minutes.
2. The tops should become beautifully golden brown.
3. The bread should sound slightly hollow when tapped.
4. For accuracy, the internal temperature should reach approximately 190–200°F (88–93°C).
5. If the tops brown too quickly, loosely cover them with aluminum foil.
Step 9: Brush with Butter
1. Remove the bread pans from the oven.
2. Immediately brush the tops with melted butter.
3. This gives the crust a beautiful shine and soft texture.
4. Allow the bread to rest in the pans for 5–10 minutes.
5. Carefully remove the loaves from the pans.
Step 10: Cool and Slice
1. Transfer the loaves to a wire cooling rack.
2. Allow them to cool completely before slicing.
3. Use a serrated bread knife for clean slices.
4. Serve with butter, jam, honey or your favorite sandwich fillings.
Nutritional Information
Estimated values per slice, assuming 2 loaves and approximately 20 slices total.
Nutrient Amount
Calories 155 kcal
Protein 4.5 g
Total Fat 3 g
Saturated Fat 1.5 g
Carbohydrates 28 g
Dietary Fiber 1 g
Total Sugar 3 g
Sodium 235 mg
Cholesterol 7 mg
Nut Information (Q/S)
Naturally nut-free recipe
This basic homemade white bread recipe contains no added nuts.
Nut Type Amount
Almonds 0 g
Walnuts 0 g
Cashews 0 g
Peanuts 0 g
Pecans 0 g
Pistachios 0 g
Hazelnuts 0 g
Allergy Information:
– Contains wheat/gluten.
– Contains dairy from milk and butter.
– No peanuts or tree nuts are intentionally added.
– Check flour, yeast and other packaged ingredients for cross-contamination warnings.
Helpful Tips for Perfect Homemade Bread
1. Use warm milk: It helps activate the yeast without damaging it.
2. Measure flour carefully: Too much flour can make bread dry and heavy.
3. Knead properly: Good gluten development creates a fluffy texture.
4. Allow enough rising time: The dough should double during the first rise.
5. Don’t rush cooling: Cutting hot bread can make the inside gummy.
6. Brush with butter: This produces a soft, flavorful crust.
7. Use bread flour: For a slightly chewier, more structured loaf.
Storage Instructions
– Room temperature: Store in an airtight bread bag for 3–4 days.
– Refrigerator: Not recommended because refrigeration can make bread stale faster.
– Freezer: Freeze sliced bread for up to 2–3 months.
– Reheating: Toast individual slices or warm briefly in the oven.
– Meal preparation: Slice both loaves and freeze portions for convenient breakfasts.
Serving Suggestions
Enjoy your homemade bread with:
– Butter and strawberry jam
– Honey and cream cheese
– Scrambled eggs
– Peanut butter
– Grilled cheese sandwiches
– Chicken sandwiches
– Homemade garlic butter
– Toast with avocado
Final Result
Beautiful golden-brown homemade bread with a soft, fluffy interior, delicate buttery flavor and tender crust. Every slice is fresh, delicious and perfect for breakfast, sandwiches or afternoon tea.
Once you make homemade bread from scratch, you’ll love having these fresh, fluffy loaves ready for your family!