
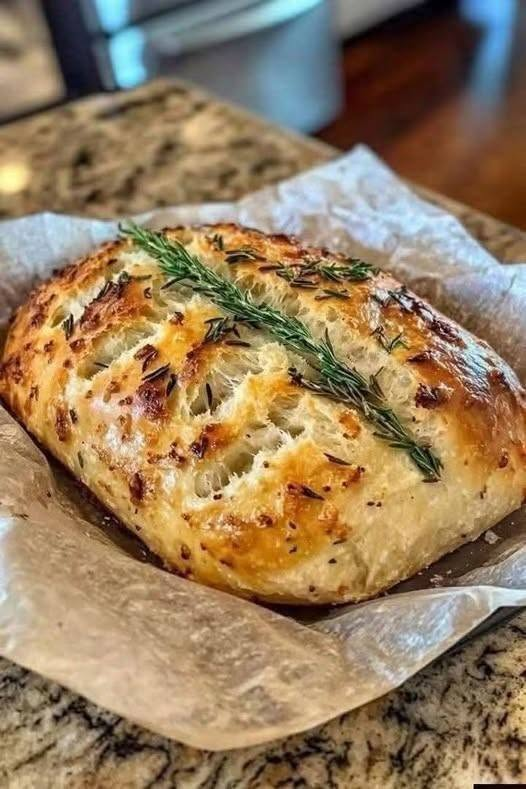
The bread in your photo looks like a rustic, crusty homemade loaf with a soft, airy interior, golden crust, garlic/onion-like pieces, and fresh rosemary. A Dutch oven or covered heavy pot is ideal for reproducing that crackly crust and open crumb.
Recipe at a Glance
Yield: 1 large loaf, about 8–10 slices
Prep: 15–20 minutes
Rise: 12–18 hours
Bake: 40–50 minutes
Difficulty: Easy
Style: No-knead artisan bread
Ingredients
For the bread
-
3 cups (375 g) all-purpose flour
-
1 cup (125 g) bread flour — or use all-purpose flour
-
1¾ cups (420 ml) lukewarm water
-
2 teaspoons salt
-
1 teaspoon instant or active dry yeast
-
1 tablespoon olive oil
-
2–3 cloves garlic, very finely minced
-
1 tablespoon fresh rosemary, finely chopped
-
1 teaspoon dried thyme
-
½ teaspoon freshly ground black pepper
-
½ teaspoon honey or sugar
Optional additions
For a loaf similar to the one pictured, you can add:
-
¼ cup finely grated Parmesan
-
2 tablespoons finely minced roasted garlic
-
1–2 tablespoons finely chopped caramelized onion
-
½ teaspoon red pepper flakes
Don’t add all of these at once if you want a light, airy loaf. About ¼–½ cup total of additional ingredients is plenty.
Step-by-Step Instructions
1. Prepare the yeast mixture
Place the lukewarm water in a large mixing bowl.
Add:
-
Yeast
-
Honey or sugar
Stir gently and let stand for 5–10 minutes if using active dry yeast.
If you’re using instant yeast, you can simply add it directly to the flour.
The water should feel comfortably warm—not hot.
Very hot water can damage the yeast.
2. Combine the dry ingredients
In a separate bowl, combine:
-
All-purpose flour
-
Bread flour
-
Salt
-
Black pepper
-
Thyme
Mix well.
3. Add the herbs and garlic
Add the chopped:
-
Rosemary
-
Garlic
If using Parmesan, add it now as well.
Mix everything through the flour so the flavorings are evenly distributed.
4. Make the dough
Add the dry ingredients to the water.
Pour in 1 tablespoon olive oil.
Using a wooden spoon or sturdy spatula, mix until there are no obvious dry patches of flour.
The dough should be:
-
Sticky
-
Soft
-
Shaggy
-
Slightly wet
Don’t worry about making it smooth.
Important:
Do not knead it.
That’s the advantage of this recipe.
5. Long fermentation
Cover the bowl tightly with plastic wrap, a lid, or a damp kitchen towel.
Leave it at room temperature for approximately:
12–18 hours
The dough should become:
-
Puffy
-
Bubbly
-
Almost doubled in size
-
Loose and stretchy
A cooler room may require closer to 18 hours.
A warm room may need only 10–12 hours.
6. Shape the loaf
Generously flour your work surface.
Scrape the dough onto it.
Your dough will be sticky—that’s normal.
Lightly flour your hands and fold the dough toward the center several times.
Turn it over so the seams are underneath.
Gently shape it into a round or oval loaf.
Don’t overwork it.
You want to preserve the gas bubbles created during fermentation.
7. Second rise
Place the shaped dough on a piece of parchment paper.
Cover loosely with a clean towel.
Let it rest for approximately:
30–60 minutes
While the dough rests, preheat your oven.
8. Preheat the Dutch oven
Place a Dutch oven or heavy oven-safe pot with its lid inside the oven.
Heat the oven to:
450°F / 230°C
Let the pot heat for at least 30 minutes.
This is important because the extremely hot pot helps create the dramatic crust seen in the photograph.
9. Score the bread
Remove the hot Dutch oven carefully.
Using a sharp knife or bread lame, make one long slash across the top of the dough.
You can make a few smaller cuts as well.
Place a small sprig of fresh rosemary on top if desired.
Tip:
Don’t press the rosemary deeply into the dough. Just lay it on top.
10. Optional golden topping
For a beautiful glossy crust like the photograph, lightly brush the surface with:
-
1 teaspoon olive oil
Or brush with:
-
1 tablespoon beaten egg + 1 teaspoon water
The egg produces a darker, shinier crust.
For the rustic appearance in your image, olive oil is sufficient.
11. Bake
Carefully transfer the dough, still on the parchment, into the hot Dutch oven.
Cover with the lid.
Bake covered:
25–30 minutes at 450°F / 230°C
Then remove the lid.
Bake uncovered:
15–20 minutes
The bread should become deeply golden brown.
For an especially crisp crust, give it another 3–5 minutes.
12. Check for doneness
The internal temperature should be approximately:
200–210°F (93–99°C)
If you don’t have a thermometer, tap the bottom.
It should sound hollow rather than dull.
13. Cool before slicing
Remove the loaf from the Dutch oven.
Place it on a wire rack.
Allow it to cool for at least:
45–60 minutes
before slicing.
This is important.
The interior continues to set as the bread cools. Cutting it immediately can make the crumb gummy.
How to Make It Look Like the Photo
For the closest visual match:
-
Make the loaf oval rather than perfectly round.
-
Use fresh rosemary.
-
Add finely chopped garlic.
-
Add a small amount of Parmesan.
-
Brush lightly with olive oil before baking.
-
Score one long central slash.
-
Place a fresh rosemary sprig along the top.
-
Bake until deep golden brown, not pale.
-
Cool completely before cutting.
The combination of high heat + covered baking + steam trapped inside the Dutch oven is what gives you that rustic crust.
Roasted Garlic Version
If you want a sweeter, richer garlic flavor, use roasted garlic instead of raw garlic.
Make roasted garlic
Take a whole garlic bulb.
Cut off the top.
Drizzle with olive oil.
Wrap loosely in foil.
Bake at:
375°F / 190°C for 35–45 minutes
until the cloves become soft and golden.
Cool, then squeeze the garlic from the skins.
Mash 2–3 tablespoons roasted garlic and fold it into the dough.
This produces a much more mellow garlic flavor.
Parmesan Version
For a cheesy herb loaf, add:
-
¼–⅓ cup finely grated Parmesan
-
1 teaspoon extra rosemary
-
½ teaspoon black pepper
Avoid adding excessive cheese because it can make the loaf heavier and interfere with the open crumb.
Nut & Allergen Information
Nuts
No nuts are required for this recipe.
There are:
-
No peanuts
-
No almonds
-
No walnuts
-
No cashews
-
No pistachios
-
No pecans
However, if you’re preparing this for someone with a severe allergy, check the flour, Parmesan, yeast and any packaged ingredients for cross-contact warnings.
Other common allergens
Wheat/gluten: Yes
Dairy: Only if Parmesan is used
Egg: Only if you use an egg wash
Soy: Usually no, but check packaged ingredients if required
Nut-free version
Simply make the recipe as written without nuts. No substitution is necessary.
Approximate Nutrition
For the basic loaf without Parmesan, divided into 10 slices:
| Nutrient | Approx. per slice |
|---|---|
| Calories | 160–180 kcal |
| Carbohydrates | 30–33 g |
| Protein | 5–6 g |
| Fat | 2–3 g |
| Fiber | 1–2 g |
| Sugar | <1 g |
| Sodium | ~230–300 mg |
Values vary according to flour, salt, oil and slice size.
Adding Parmesan increases protein, fat and sodium.
Recipe Q&A
Why is my dough so sticky?
That’s expected with a high-hydration no-knead dough.
Don’t keep adding flour.
Instead, lightly flour your hands and work surface when shaping.
Can I use only all-purpose flour?
Yes.
Use 4 cups (500 g) all-purpose flour.
Bread flour simply gives the loaf a slightly chewier structure.
Can I use whole-wheat flour?
Yes, but don’t replace all the white flour immediately.
Start with:
1 cup whole-wheat + 3 cups white flour.
Whole-wheat flour absorbs more water and produces a denser loaf.
Can I make this without a Dutch oven?
Yes.
Place the dough on a baking sheet or baking stone.
Put a separate metal pan on the bottom rack while the oven preheats.
When you put the bread in, carefully add hot water to the pan to create steam.
Bake at 450°F / 230°C.
The Dutch oven method is easier and generally gives a better crust.
Why do I need to bake it covered?
The lid traps moisture released from the dough.
This creates steam around the loaf, allowing the crust to remain flexible while the bread expands.
After removing the lid, the remaining moisture escapes and the crust becomes crisp and brown.
Can I reduce the rising time?
You can, but the long fermentation gives the best flavor.
For a faster version, use slightly more yeast and allow the dough to rise for about 2–3 hours, followed by a short second rise.
The flavor won’t be quite as developed.
Can I let it rise overnight?
Yes—that’s what this recipe is designed for.
Prepare the dough in the evening and bake it the next morning.
If your kitchen is particularly warm, refrigerate the dough after several hours so it doesn’t over-ferment.
What if my bread doesn’t rise?
Possible causes include:
-
Old/inactive yeast
-
Water that was too hot
-
Very cold room
-
Too much salt
-
Insufficient fermentation time
If your kitchen is cold, simply give the dough more time.
Why is my bread dense?
The most common causes are:
-
Not enough fermentation
-
Too much flour added during shaping
-
Overworking the dough
-
Old yeast
-
Cutting the bread while it’s still hot
For an airy crumb like the photograph, handle the dough gently after the first rise.
Can I add onion?
Absolutely.
Caramelized onion works especially well.
Use about ¼ cup finely chopped, well-drained caramelized onion.
Don’t add a large amount of wet onion because excess moisture can affect the dough.
Can I add rosemary directly on top?
Yes.
Fresh rosemary is particularly attractive on this loaf.
Brush it lightly with olive oil before baking so it doesn’t dry out excessively.
Can I use dried rosemary?
Yes.
Use approximately 1 teaspoon dried rosemary in place of 1 tablespoon fresh.
Crush it between your fingers before adding it to release its aroma.
How should I store the bread?
Once completely cool, store it in:
-
A paper bag, or
-
A bread bag/container that isn’t completely airtight.
Avoid refrigerating it—the refrigerator can make bread stale faster.
Can I freeze it?
Yes.
Slice the cooled loaf and freeze the slices in an airtight freezer bag.
It will keep well for approximately 2–3 months.
You can toast individual slices directly from frozen.
Why did my crust become soft?
The bread was probably stored while still warm.
Let it cool completely before storing.
If the crust has already softened, place the loaf in a 350°F / 175°C oven for 5–10 minutes to refresh it.
Best Version for Your Photo
If I were making the loaf specifically to reproduce the image, I’d use:
4 cups flour + 1¾ cups water + 2 tsp salt + 1 tsp yeast + 1 tbsp olive oil + 3 cloves garlic + 1 tbsp fresh rosemary + 1 tsp thyme + ¼ cup Parmesan.
Ferment overnight, shape gently, place in a 450°F/230°C preheated Dutch oven, bake 30 minutes covered + 15–20 minutes uncovered, then cool for an hour.
That should give you the crisp golden exterior, rustic shape, airy interior, garlic-herb flavor, and rosemary-topped finish shown in the photo.